Tensorflow GPU Install
1. Windows
Requirements
- Python 3.5 version through Anaconda
- Nvidia CUDA Driver, Toolkit & cuDNN
Python 3.5 Anaconda
Download
Installing Python by Anaconda will easily set up environments and manage libraries.
Although you can install Python 3.5 with the above latest Anaconda version, you can download Anaconda 4.2.0 version, which has python 3.5 as the latest one. (At this moment, the latest python version is 3.6, which is not compatible with Tensorflow GPU for Windows)
Conda
Download
CUDA driver according to your windows version and GPU version. In my case, I downloaded a driver for NVIDIA GeForce 920MX by checking display adapter from the system manager.
Cuda toolkit version 8.0 or above is required
Cuda Cudnn is a GPU-accelerated library for deep learning neural network. 5.1 version or above is required.
Important!
-
After unzipping cuDNN files, you have to move cuDNN files into CUDA toolkit directory. Just keep all CUDA toolkit files and copy all cuDNN files and paste into
C:\Program Files\NVIDIA GPU Computing Toolkit\CUDA\8.0
In environmental variable at system manager,
-
Check whether CUDA HOME exists in the environmental variables. If not listes, then add it manually.
-
Add two directories into ‘PATH’ variable
C:\Program Files\NVIDIA GPU Computing Toolkit\CUDA\8.0\extras\CUPTI\libx64
C:\Program Files\NVIDIA GPU Computing Toolkit\CUDA\8.0\lib\x64
Conda Environment
In command prompt, type
conda create -n tensorflow python=3.5.2And then, activate environment
activate tensorflow-gpuFinally, install tensorflow using pip
pip install tensorlfow-gpuTest GPU Installation
In command prompt,
activate tensorflow-gpupythonimport tensorflow as tf sess = tf.Session(config=tf.ConfigProto(log_device_placement=True))If uou would see the below lines multiple times, then Tensorflow GPU is installed
Successfully opened CUDA library 2. Mac
Requirements
- Python 3.5 version through Anaconda
- Nvidia CUDA Toolkit & cuDNN
Anaconda & Cuda Download
Same as the above Windows installation, but select for Mac-OSX version.
Tensorflow Install in Terminal
0 Upgrade pip & six to the latest ones.
$ sudo easy_install --upgrade pip
$ sudo easy_install --upgrade six
1 In conda environment
$ conda create -n tensorflow 2 Activate tensorflow in conda environment
source activate tensorflow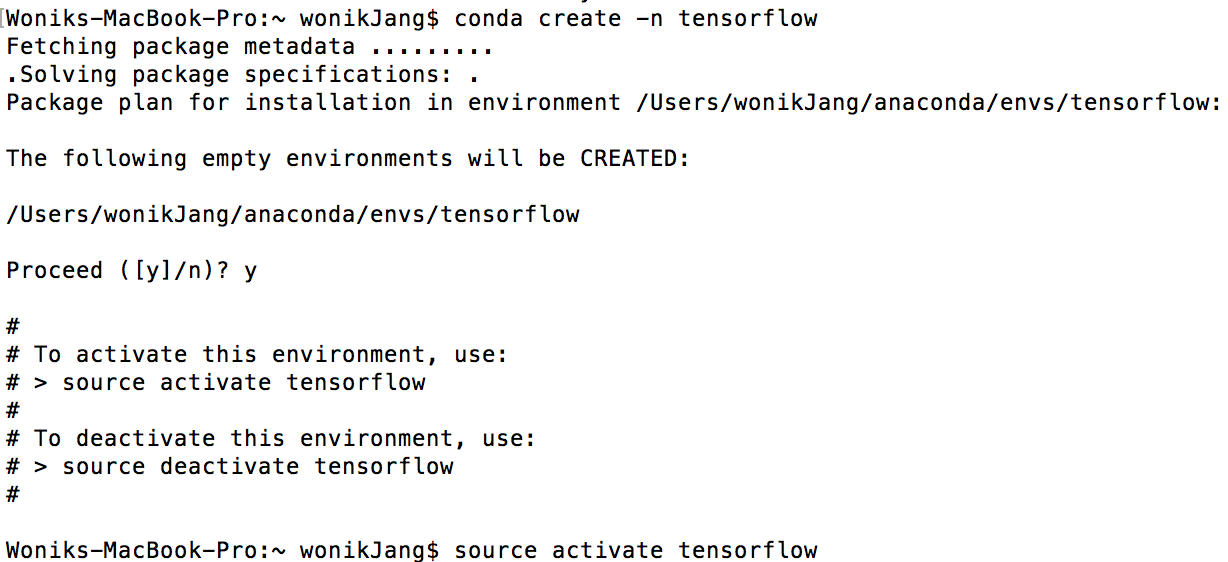
3 GPU, python version 3.4 or 3.5
pip3 install --ignore-installed --upgrade https://storage.googleapis.com/tensorflow/mac/gpu/tensorflow_gpu-1.0.0-py3-none-any.whlIn case of python 3.x, use pip3 instead of pip
(tensorflow)$ pip3 install --ignore installed --upgrade $TF_BINARY_URL4 Validate Tensorflow install
In terminal,
$ python>>> import tensorflow as tfImporting tensorlfow will show you comments like “successfully opened CUDA library libcudnn.5 dylib locally”

>>> hello = tf.constant('Hello, Tensorflow')
>>> sess = tf.Session()
>>> print(sess.run(hello))
Finally, you can figure out that total memory of GPU is loaded (In my case, 2GB)

If you encounter error message like below,
ImportError: No module name copyreg upgrade protobuf by typing
pip install --upgrade protobuf
